What this blog is about ?
This blog is about setting up a https server with Node js. Node js runs at the 4th layer of OSI model. Therefore it provides a lot of core tweaking options
like CORS and https which are not intuitively available in other frameworks like Spring (No offense pls).
References:
I wrote this blog, following the blog below on https. I just tried it and added more details to it. I do not intend to steal some one else’s work.
Read my blog or the other blog cited below, or both, which ever is most helpful to you.
Ref:http://www.hacksparrow.com/node-js-https-ssl-certificate.html
STEPS:
The steps are stated for firefox, version 38.05.MAC OSC 10.9.5
1. Generate Private Key
openssl genrsa -out hacksparrow-key.pem 1024
<<1-generateRSPrivateKey.png>>

2.Make a certificate request.Provide some basic details and make the request.
openssl req -new -key hacksparrow-key.pem -out certrequest.csr
<2-makeCertificateRequest.png>

3. Sign the certificate request and get a signed certificate.
openssl x509 -req -in certrequest.csr -signkey hacksparrow-key.pem -out
<<3-SignWithPrivateKey.png>>

4. create the package json file.
<<Enclosed package.json file in code tag>>
This blog is about setting up a https server with Node js. Node js runs at the 4th layer of OSI model. Therefore it provides a lot of core tweaking options
like CORS and https which are not intuitively available in other frameworks like Spring (No offense pls).
References:
I wrote this blog, following the blog below on https. I just tried it and added more details to it. I do not intend to steal some one else’s work.
Read my blog or the other blog cited below, or both, which ever is most helpful to you.
Ref:http://www.hacksparrow.com/node-js-https-ssl-certificate.html
STEPS:
The steps are stated for firefox, version 38.05.MAC OSC 10.9.5
1. Generate Private Key
openssl genrsa -out hacksparrow-key.pem 1024
<<1-generateRSPrivateKey.png>>

2.Make a certificate request.Provide some basic details and make the request.
openssl req -new -key hacksparrow-key.pem -out certrequest.csr
<2-makeCertificateRequest.png>

openssl x509 -req -in certrequest.csr -signkey hacksparrow-key.pem -out
<<3-SignWithPrivateKey.png>>

<<Enclosed package.json file in code tag>>
{
"name": "NodeHttps",
"version": "1.0.0",
"description": "NodeHttps",
"main": "server.js",
"author": "MaheshRajannan",
"license": "ISC",
"dependencies": {
"https": "*",
"fs": "*"
}
}
<<Enclosed server.js file in code tag>>
var https = require('https');
var fs = require('fs');
var hskey = fs.readFileSync('/Users/maheshrajannan/Samples/Workspaces/nodeJs/Udemy/sslCerts/hacksparrow-key.pem');
var hscert = fs.readFileSync('/Users/maheshrajannan/Samples/Workspaces/nodeJs/Udemy/sslCerts/hacksparrow-cert.pem')
var options = {
key: hskey,
cert: hscert
};
https.createServer(options, function (req, res) {
res.writeHead(200);
res.end("Hi from HTTPS");
}).listen(8000, function(){
console.log('https web server listening on port '+8080);
});
Note: in production environments, certificates are mounted on an external mount and referred to by PATH variables. Using a path relative(or otherwise) to the project, will cause trouble.
Recommended Approach: Establish a path variable CONFIG. Refer to the cert as $CONFIG/ssl.
npm install
<6-npmInstall.png>

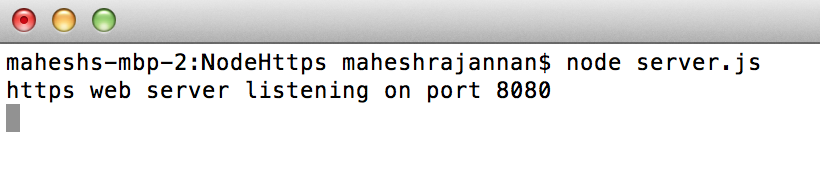
node server.js
<<7-RunServer.png>>
<<8-AccessInBrowser.png>>

<<9-PromptForException.png>>

<<10-ConfirmSecurityException.png>>

<<11-thePage.png>>

<<12-CertificateFromBrowser.png>>

<<13-MoreInformation.png>>

<<14-CertificateView.png>>
Notice that the information we provided in creating the certificate is shown. What this means is that browser makes a request and server supplies the certificate information.The SSL connection is then made.
When buying CA signed certificate browser will establish connection after verifying the certificate authenticity. Most(99.9%) CA signed certificates(and their corresponding identities) are trusted by the browser.
16. IMPORTANT NOTE: If using SSL for a service it is important to visit the browser and add exception for the service port as well. Mozilla is very strict, with respect to untrusted SSL. Though you add https://localhost:8080, the service port https://localhost:3000 is not allowed by default , even for making a pre-flights call.
No comments:
Post a Comment