Wednesday, September 16, 2015

SelfSigned-SelfCertified-SSLCertificate

This is what we have done to achieve the result. Please examine the comments in code and run it to fully understand self signed and self certified SSL certificates, so that you can test your application with SSL.
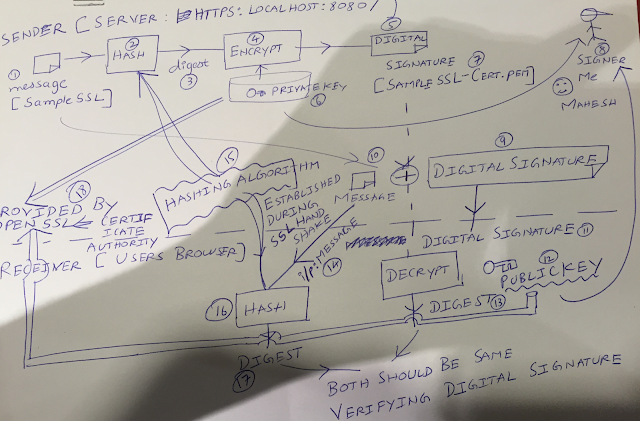
Correlate the file names in the below diagram to that of in the code to understand what is exposed to client and what is exposed to the server.
The private keys of certificate authority are exposed to no one.The certificate authority is added to the (node.js) client so that it can automatically test the application in SSL.


TestingTheSSL

Before we begin writing test cases, let's try to run it and expose one caveat with (with respect to testing) it.

The full steps of how to run it is on github here

I will just cover the steps which is a caveat for junit testing with SSL.

Step 2: (In How To Run) Access Browser


Step 3: Security Exception


Step 4: Add Exception

This 4th step is because this is a self signed certificate and not 3rd party signed certificate.
On our next blog we will cover what this means and how to over come this problem , so that we can successfully test it the automated way.


Step 5: See The Page


Saturday, September 12, 2015

SSL Hands On

This is a continuation of the previous post. For the impatient like me :) please refer source code here and download it.

https://github.com/maheshrajannan/NodeJs-SSL

Please take a look at the diagram here.


A message (SampleSSL marked as (1) in the diagram below) is encrypted by a private key to produce digital signature (SampleSSL-Cert.pem marked as (7) ). I am the signer of this digital certificate (marked as (8) ) . The private public key pair is provided in this case by open SSL (marked as (18) ).

The digital signature (11) , is de-crypted by public key (12) and we have a digest at client (browser).
The input message (14) is hashed and we receive a digest (17) . Both should be same verifying the digest. Now the digital signature is verified and the owner (Me, Mahesh Rajannan) is verified and non repudiated ( i cannot deny it is not my signature) . The hashing algorithm (15) is established during SSL handshake, along with 10 other things.

A bunch of shared secrets are exchanged between sender (client browser) and receiver (server, localhost:8080) through asymmetric cryptography.Asymmetric cryptography is nothing but encrypt with public key and de-crypt with private key.

The source code for this is here. Please feel free to download and enjoy.

 One shared secret is selected, through symmetric key cryptography the message (
Hi from HTTPS) is exchanged , in an encrypted format between client and server,
using the shared key
 
 
References:
 
http://security.stackexchange.com/questions/20803/how-does-ssl-tls-work

https://en.wikipedia.org/wiki/Transport_Layer_Security

https://en.wikipedia.org/wiki/OSI_model

https://en.wikipedia.org/wiki/Public-key_cryptography 
 

SPAConceptDemonstrated

Objective:

In this post, the SSL certificate is created the same way as in the previous post and a working node js web app is created. How SSL works is briefly explained in tandem with how we created this web application.


Please take a look at the certificate creation here.This is the ReadMe file of the project

Step 1: Private Key

maheshs-mbp-2:Certificates maheshrajannan$ openssl genrsa -out sampleSSL-key.pem 1024


Step 2: Certificate Request

maheshs-mbp-2:Certificates maheshrajannan$ openssl req -new -key sampleSSL-key.pem -out certrequest.csr


Note the message used.
  
A challenge password []:SampleSSL

Step 3: Digital Certificate

maheshs-mbp-2:Certificates maheshrajannan$ openssl x509 -req -in certrequest.csr -signkey sampleSSL-key.pem -out sampleSSL-cert.pem

Now lets take a break and run it.